Creating a Fire Alarm Symbol Legend
You can create a fire alarm symbol legend that reflects the devices in your project using the scheduling features in standard Revit, in combination with FireBIM model families and shared parameters. A basic symbol legend can be made by following these steps:
-
Run the Revit Analyze→
 Schedule/Quantities command. The New Schedule dialog box will open.
 -
Set Filter list ▾ to Electrical.
-
Set Category ☰ to <Multi-Category>.
(Optional) Set the Name to your preferred name for the legend, such as FA SYMBOL LEGEND. -
Press the button. The dialog box will close and the Schedule Properties dialog box will open.
-
On the Fields tab, add Type Image to the Scheduled fields ☰ list, along with any other parameters you want to display (common parameters include Count, Description, Manufacturer, Model, FBIM_Mounting, and FBIM_Note).
noteYou must include at least one FireBIM shared parameter, which will be used to filter non-fire alarm elements.
-
On the Filter tab, set Filter by ▾ to a FireBIM shared parameter, such as FBIM_Mounting or FBIM_Note. A second dropdown menu will appear; set the value to parameter exists.
-
On the Sorting/Grouping tab, set Sort by ▾ to Type Image, then uncheck the ☐ Itemize every instance checkbox.
warningTo have a functioning symbol legend, you must use this configuration, which will group together devices that use a common Type Image. Other configurations—such as using a different sorting parameter, not sorting, or itemizing every instance—will lead to schedules that don't function as a symbol legend.
-
(Optional) If the FireBIM shared parameter used in step 6 does not need to be displayed in the legend, on the Formatting tab, select the parameter in Fields ☰, then check the ☐ Hidden field checkbox.
-
Press the button to close the dialog box and create the schedule.
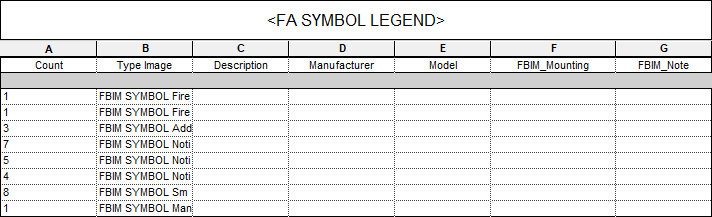
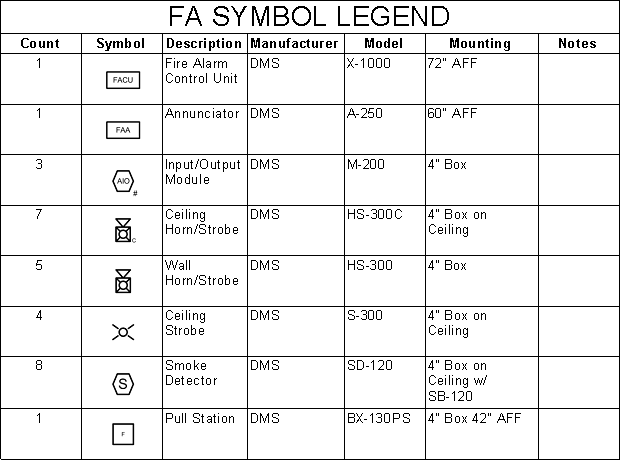
Once the symbol legend has been created, you can customize its formatting and appearance the same way as any other Revit schedule. The Type Image values will display the filename of the image in the schedule view, but will render the image itself when the legend is inserted on a sheet.
Symbol images will automatically resize to fit the width of the Type Image column. For the default symbols included with FireBIM model families, a column width of 1" is recommended.
Video Demonstration
Customizing Your Symbol Legend Images
All of the model families provided in the FireBIM family core library include PNG images that are matched to the plan view and riser diagram symbols for each family type. If you plan to customize your symbols, you must update your symbol legend images using standard Revit functionality and an image editing tool. The basic workflow follows these steps:
-
After customizing the plan view and/or riser diagram symbol for your fire alarm device, insert the symbol on a Revit drafting view using the Revit Annotate→
 Symbol or Annotate→
  Detail Component command.note
The scale of the drafting view should be a scale you typically use in your projects; the default symbol legend images were created in 1:12 scale.
-
Zoom the view in or out until the symbol is an appropriate size.
noteTo match the default symbol legend images, it should fit comfortably within a rectangle roughly 634 pixels wide by 343 pixels high.
-
Take a screenshot of the symbol. You can use the ALT + PRT SCN keyboard shortcut to copy the active window to your clipboard, or a screen capture tool like the Windows Snipping Tool.
-
Using an image editor, crop the screenshot to the size you want for the symbol legend, then save the image. PNG format is recommended.
Assigning the Image to a Family Type
Once you have your updated symbol legend image, you will need to modify your fire alarm device families to include that image by following these steps:
-
In the device family, run the Revit Create→
 Family Types command. The Family Types dialog box will open.
 -
In the Identity Data section, select the Type Image parameter, then, on the right side of the Value cell, press the button. The Manage Images dialog box will open.
-
Press the button, then navigate to and open your symbol legend image to import it.
warningMake sure the Path Type ▾ is set to Absolute. Relative links will break if the family is accessed from another location or if the image is ever moved.
-
Select the image and press the button. The dialog box will close and the Value will populate with the name of the image.
-
(Optional) If your family has multiple types that will use the image, select each type using the Type name ▾ dropdown and repeat steps 2 and 4.
-
Press the button to save your changes and close the dialog box.