Creating Distribution Equipment
Create and power distribution equipment both in the Revit model and on the single-line diagram.
Start in the SINGLE-LINE DIAGRAM drafting view.
Create and Power Panel L
-
Run the
ElectroBIM Single-Line→ command. The Create Equipment dialog box will open. Insert Create
 -
Set Callout to L.
-
Set Level ☰ to FIRST FLOOR.
-
Set Distribution System ▾ to 120/208 Wye.
-
Set Model Family ☰ to Lighting and Appliance Panelboard - 208V MLO - Surface.
-
Press the button to close the dialog box.
-
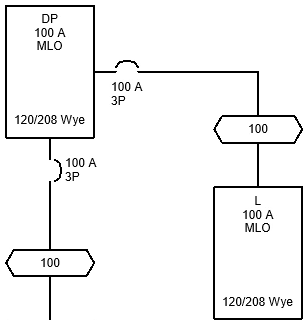
Insert the panel on the drafting view. You will be prompted to select a distribution equipment to power the panel.
-
Select panel DP.
A feeder will be drawn between panel DP and panel L.
Find and Move Panel L in the Model
-
Run the
ElectroBIM Single-Line→ command. Highlight Device
 -
Select panel L. The FIRST FLOOR POWER floor plan will open with panel L highlighted.
-
Select panel L and go to the Revit Electrical Circuits tab. The Panel and Distribution System fields reflect the settings configured in the steps above.
-
Run the Revit Modify | Electrical Equipment→
 Pick New command.
 -
Move panel L beside panel B inside the building.
Optionally, you can use the Revit ![]() Tag by Category command to label panel L on the floor plan.
Tag by Category command to label panel L on the floor plan.