Equipment connections have been given a major upgrade in this release. A schedule of all the equipment in a project can be printed to a drawing. Equipment can be created in the database but not inserted on a drawing. The equipment commands have been updated and expanded to support this new functionality.
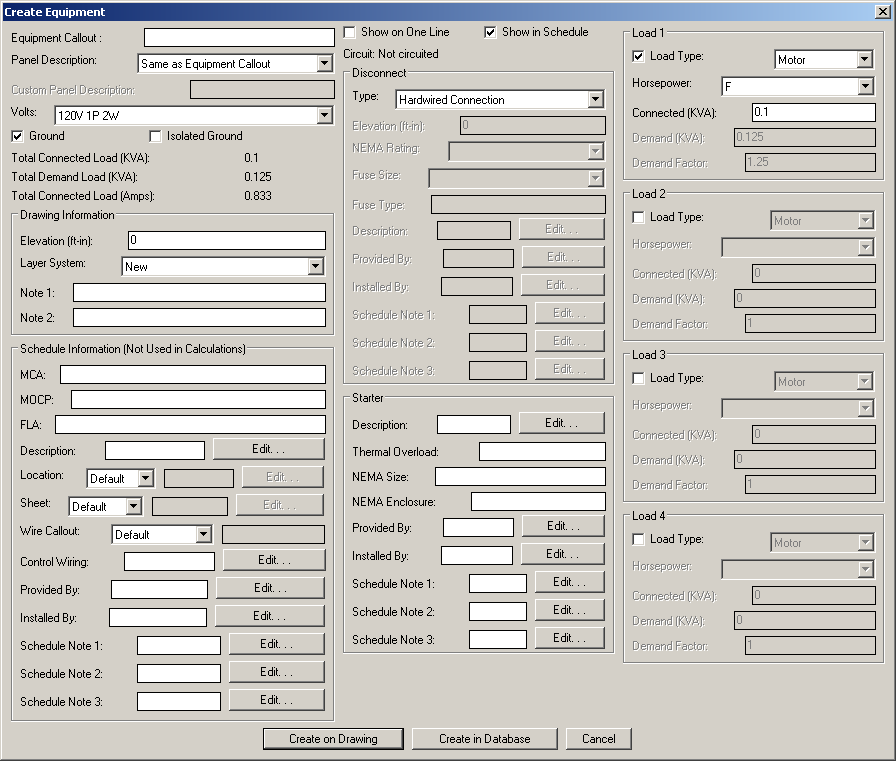
![]() Create Equipment: The Create Equipment dialog is significantly larger than before. All of the new values you can store in equipment is used for scheduling purposes only. Values such as MCA, MOCP, and FLA are not used for calculations yet. None of the new information is required. You can leave the values that you do not use blank.
Create Equipment: The Create Equipment dialog is significantly larger than before. All of the new values you can store in equipment is used for scheduling purposes only. Values such as MCA, MOCP, and FLA are not used for calculations yet. None of the new information is required. You can leave the values that you do not use blank.
There are two buttons you can use to create the equipment:
![]() Query Equipment in Database: This command displays a list of all the equipment in the database and allows you to select one to query and edit. This is how you can query equipment that is in the database but not on a drawing.
Query Equipment in Database: This command displays a list of all the equipment in the database and allows you to select one to query and edit. This is how you can query equipment that is in the database but not on a drawing.
![]() Circuit Equipment in Database: This command displays a list of all the equipment in the database and allows you to circuit them. This is how you circuit equipment that is in the database but not on the drawing.
Circuit Equipment in Database: This command displays a list of all the equipment in the database and allows you to circuit them. This is how you circuit equipment that is in the database but not on the drawing.
![]() Insert Equipment on this Drawing: This command displays a list of all the equipment in the database but not on a drawing. You can select equipment from the list to insert on a drawing.
Insert Equipment on this Drawing: This command displays a list of all the equipment in the database but not on a drawing. You can select equipment from the list to insert on a drawing.
![]() Remove Equipment from this Drawing: This command allows you to select a piece of equipment from a drawing and remove it from the drawing, but keep it in the database. You can use this command together with the Insert Equipment on this Drawing command to move an equipment connection from one drawing to another while preserving the circuiting.
Remove Equipment from this Drawing: This command allows you to select a piece of equipment from a drawing and remove it from the drawing, but keep it in the database. You can use this command together with the Insert Equipment on this Drawing command to move an equipment connection from one drawing to another while preserving the circuiting.
![]() Find Equipment on this Drawing: This command works the same as before. It finds a specific piece of equipment on a drawing for you.
Find Equipment on this Drawing: This command works the same as before. It finds a specific piece of equipment on a drawing for you.
![]() Insert Equipment Project Schedule: This command inserts a schedule of all the equipment in a project. We asked our current customers to provide us with sample equipment schedules while we were developing this feature. Over 30 customers shared what their current equipment schedules look like, and no two of them were the same.
Insert Equipment Project Schedule: This command inserts a schedule of all the equipment in a project. We asked our current customers to provide us with sample equipment schedules while we were developing this feature. Over 30 customers shared what their current equipment schedules look like, and no two of them were the same.
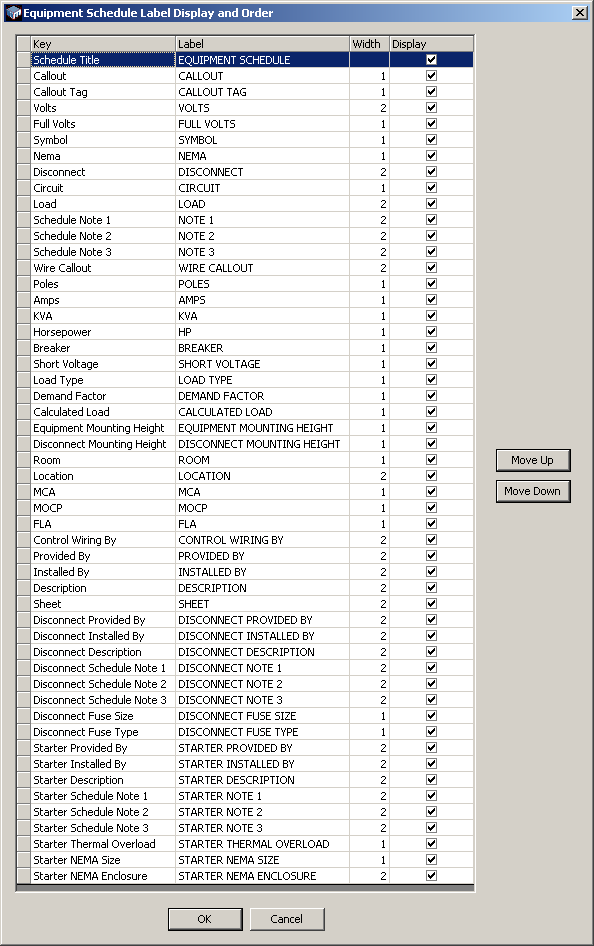
The large number of columns available in this schedule exists to allow all of these different equipment schedules to be created using Design Master Electrical. You will not want to use them all. You should choose the ones necessary to create a schedule that matches your current equipment schedule. There should be enough variety in the columns available to match most schedules.
The equipment, disconnect, and starter each have three schedule notes available. You can use these as notes or to include information that we do not have a specific field for. When you insert the schedule on the drawing, you can change the label of the column header to match the information you have inserted in that note.
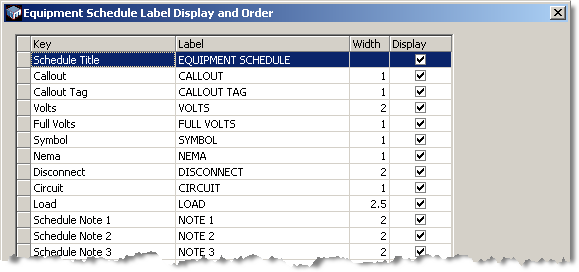
This dialog box shows all of the columns that are available to be included in the equipment schedule:
This is a sample equipment schedule with a limited number of fields included:

Custom Equipment Callout Blocks: Callouts on equipment can be customized to use a block. The block can display either the actual callout of the equipment, or an ID that can be displayed in the equipment schedule. The ID is number assigned automatically to each equipment connection. These numbers are updated and mainted by the software as equipment connections are added and removed.
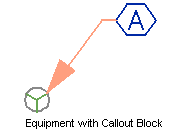 There are three blocks that are included with Design Master Electrical that can be used as a callout. These blocks can be customized to match your existing equipment callout appearance.