Floor List
To create or modify a floor, go to
Ribbon: ![]() Floor List
Floor List
Pulldown Menu:
Floor Information Dialog Box
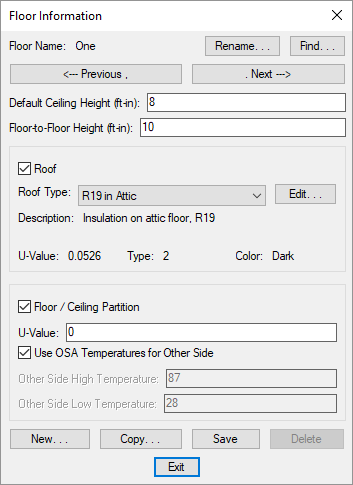
Visit the Common Schedule Dialog Box Features section for more information about how this dialog box works. This section describes the , , , , , , , and buttons.
-
Default Ceiling Height: The height of the ceiling relative to the elevation of the floor, in feet and inches. This is used when calculating the room volume. Room volume is used to calculate air changes per hour.
-
Floor-to-Floor Height: The height of the outside walls relative to the elevation of the floor, in feet and inches.
Roof
-
☐ Roof Whether the floor has a roof. If this box is checked, the rooms in the floor will include a roof by default.
-
Roof Type: ▾ The type of roof for the floor. If ☐ Roof is unchecked, this field is disabled.
The list of roof types available is defined in the Roof Project Schedule command. The other values in this section are based upon the selected Roof Type ▾.
- Press this button to open the Roof Project Schedule dialog box with the selected Roof Type ▾ active.
Floor / Ceiling Partition
-
☐ Floor / Ceiling Partition Whether the floor has a floor or ceiling partition. If this box is checked, the rooms in the floor will include a floor or ceiling partition by default.
Check this box when there is an unconditioned space either above or below the floor. There will be heat transfer through the area based upon the temperature difference, but there will be no solar load. If you need a solar load, use the ☐ Roof section instead.
-
U-Value: The heat transfer coefficient of the floor or ceiling partition.
To model a floor and a ceiling partition, enter the sum of their u-values in the U-Value field.
-
☐ Use OSA Temperatures for Other Side What temperatures are used for air on the other side of the partition.
Check this box to use the outside air temperatures set in the Project Info dialog box. The high temperature used for the cooling load will change during the day.
Uncheck this box to manually enter values for the Other Side High Temperature and Other Side Low Temperature fields. The high temperature will not change during the day.
-
Other Side High Temperature: The high temperature on the other side of the partition used during cooling load calculations. If ☐ Use OSA Temperatures for Other Side is checked, this field is disabled.
-
Other Side Low Temperature: The low temperature on the other side of the partition used during heating load calculations. If ☐ Use OSA Temperatures for Other Side is checked, this field is disabled.