Installation Settings
The
To view and modify the installation settings, go to
Ribbon: ![]() →Installation Settings
→Installation Settings
Pulldown Menu:
- 🔘 Install Type The type of installation. The dialog box will change depending upon the type selected, as described below.
Local Install
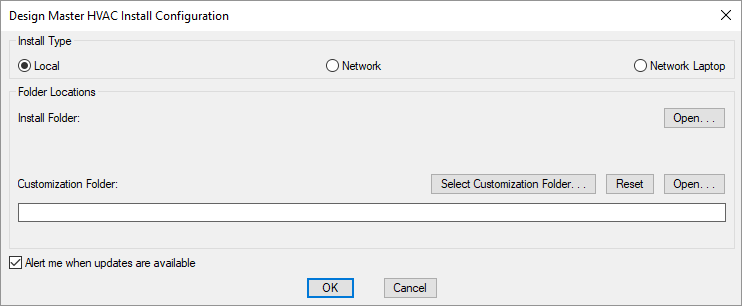
If you have floating licenses, this install type should not be used.
- Install Folder: The folder where Design Master HVAC is installed. This folder is forced to be located in your Application Data folder.
-
Customization Folder: The folder where the customization files are stored.
-
Press this button to select a new location for the Customization Folder.
-
Press this button to reset the Customization Folder to the default location, located in your Application Data folder.
-
There are two buttons in the dialog box. Press this button to open Windows Explorer to one of the folders listed in the dialog box. The first button opens the install folder. The second button opens the customization folder.
- ☐ Alert me when updates are available Whether updates are checked for automatically. If this is checked, an update check will occur the first time you run a command each day. An alert will appear if an update is available.
Network Install
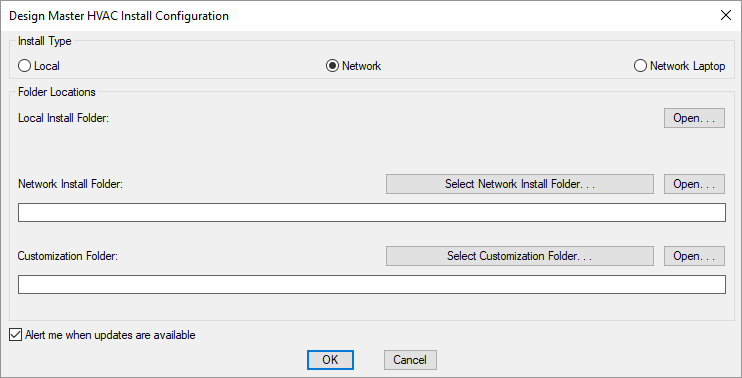
- Local Install Folder: The folder on the local computer where Design Master HVAC is installed. This folder is forced to be located in your Application Data folder.
-
Network Install Folder: The folder on the network where Design Master HVAC is installed. This folder should be on the network. All computers in your office should use the same network install folder.
Updates should be installed to this folder. Updates to this folder will automatically be copied to the local install folder.
-
Press this button to select a new location for the Network Install Folder.
-
Customization Folder: The folder where the customization files are stored. This folder should be on the network. All computers in your office should use the same customization folder.
-
Press this button to select a new location for the Customization Folder.
-
There are three buttons in the dialog box. Press this button to open Windows Explorer to one of the folders listed in the dialog box. The first button opens the local install folder. The second button opens the local install folder. The third button opens the customization folder.
- ☐ Alert me when updates are available Whether updates are checked for automatically. If this is checked, an update check will occur the first time you run a command each day. An alert will appear if an update is available.
Network Laptop Install
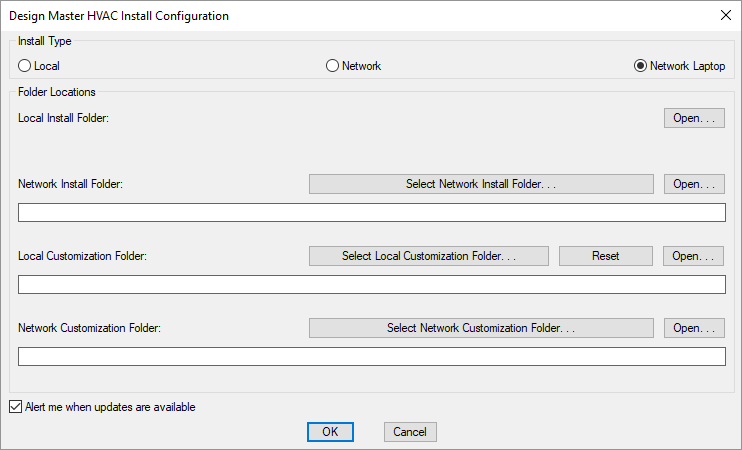
A network laptop install should be used if the computer is a laptop and multiple people are using Design Master HVAC in your office. The program files are stored on the laptop and are automatically updated from the network. The customization files are stored on both the network and the laptop. The network customization files will be used when the laptop is connected to the network. The local customization files will be used when the laptop is away from the office and disconnected from the network.
The local customization will automatically be updated with any changes to the network customization once a day. Use the Update Laptop Customization command to manually update the customization stored on the computer.
-
Local Install Folder: The folder where Design Master HVAC is installed. This folder is forced to be located in your Application Data folder.
-
Network Install Folder: The folder on the network where Design Master HVAC is installed. This folder should be on the network. All computers in your office should use the same network install folder.
Updates should be installed to this folder. Updates to this folder will automatically be copied to the local install folder.
-
Press this button to select a new location for the Network Install Folder.
-
Local Customization Folder: The folder where the local customization files are stored. This customization folder is used if a network connection is not available.
-
Press this button to select a new location for the Local Customization Folder.
-
Press this button to reset the Local Customization Folder to the default location, located in your Application Data folder.
-
Network Customization Folder: The folder where the customization files are stored. This folder should be on the network. All computers in your office should use the same customization folder.
This folder is used when the computer is connected to the network. The files in this folder are copied to the local customization folder once each day.
-
Press this button to select a new location for the Network Customization Folder.
-
There are four buttons in the dialog box. Press this button to open Windows Explorer to one of the folders listed in the dialog box. The first button opens the local install folder. The second button opens the local install folder. The third button opens the local customization folder. The fourth button opens the network customization folder.
- ☐ Alert me when updates are available Whether updates are checked for automatically. If this is checked, an update check will occur the first time you run a command each day. An alert will appear if an update is available.